The morning after the second coat

Second skin

The house got to bathe in the Libra full moonlight with its freshly covered second coat on April 11th and 12th.

Mark and his assistant (the professional render team) arrived on the morning of April 11th, along with our friends Val, Charlotte and Benny Boy to help us with the second coat. Matty had envisaged the whole task taking about 8 hours each day, but thankfully we finished up around 1 pm on the second day; giving Matty and I time to celebrate this special milestone.

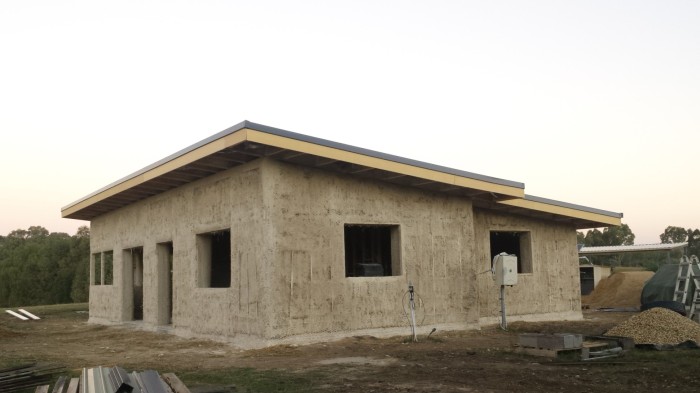
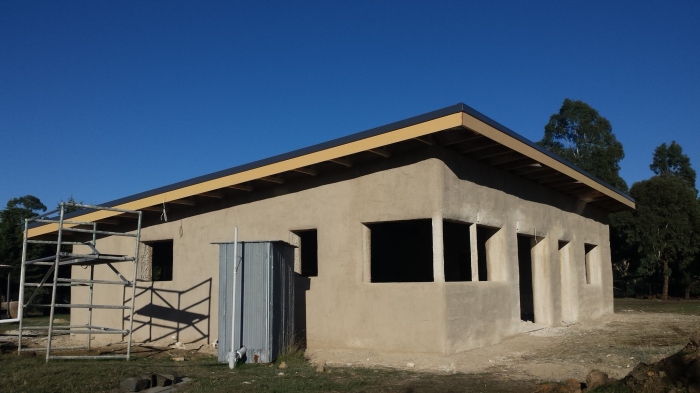
The second coat had to be followed by someone trowelling by hand after the render pump (unlike the first coat), and this trowelling started to give the walls a somewhat zigzagged, yet smoother finish. This time round the render mix consisted of 75% sand, 15% lime and 10% clay and was 30 mm thick (triple the thickness of the first coat). This thick coat is so important in terms of creating that waterproof barrier; the third coat will also assist in this but it will be heavily focused on the aesthetic appearance as opposed to this functionality. The thickness also means that 99.99% of all straw is now covered, leaving no loose material for fire to catch on to. There are still some minuscule lips of straw sticking out, but these will be covered by the third coat of render.

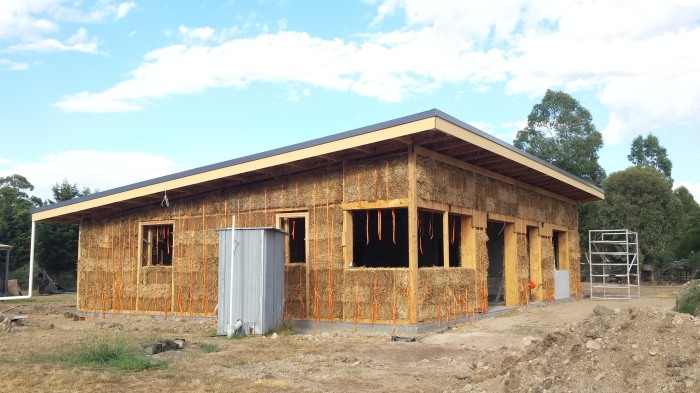
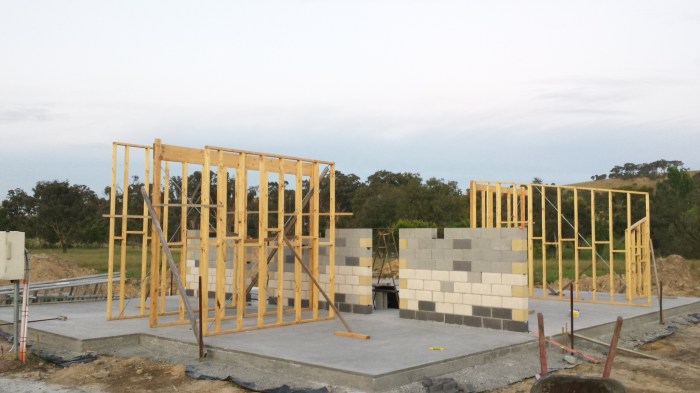
Precoat and postcoat

The walls needed some extra patch up work before the second coat, and we had some helpful hands then as well.  Matt’s business partner/best friend Joe assisted with this task whilst visiting Melbourne.  This patch work was needed to smooth out any large dents or grooves from the first coat, and also ensured that the second coat would have a much more consistent finish. During this time, Matty also carved out the niches and holes in the walls where the glass blocks will be inserted. These were the humble beginnings of the house’s aesthetic features, and it is nice to visualise the finishing touches.

Friends from Sydney visited us during the Easter break to have a holiday and see Melbourne for the first time.  Ani and Mimi helped clean up the second coat mayhem, and hopefully we helped impart some info regarding owner building as they are keen on doing something similar someday.   Matty and I are very thankful of their time and contagious enthusiasm.

As winter is near, Matty and I are now on the fast track to get the windows and external doors in, only then can we start on possibly one of the most exciting stages – the internal fitout!


West side - round 1 complete

First skin

The house finally got its first layer of skin yesterday, thus marking the beginning of the longest milestone. The third and final coat of render will not be applied till all the internal fit-out is complete, which we estimate to be late winter/early spring.

To say that this past week has been hard is an understatement. Thankfully everything went smoothly on the day, and all the hard work was worth it all, especially for the view of the house from the driveway.  As the Grand Design peeps love to say: “it blends into the environment”, and for once Matty and I seem to think so too!

View from the driveway
The house blending into the environment

Render prep

Prior to the render going on, all the timber frames, lintels, posts, top and bottom boxing had to be covered by mesh and then stuffed with straw; bondcrete also had to be applied to any other exposed timber areas that couldn’t be meshed. These two processes were to ensure that the render sticks to it and also creates a marriage between the two surfaces (the timber and the straw), so that the render can bind to both. The meshing and straw stuffing is monotonous work, but thankfully Sam and Benny Boy came to the rescue and helped unburden some of Matty’s workload.


Professional renderer

We hired a professional (Mark) who specialises in rendering strawbale buildings; Matty had met him at the strawbale workshop he attended last April, and thought it wise to use his services.

Five people (inclusive of Matty and myself) worked for over eight hours yesterday, completing the inside and the outside strawbale walls of the house. Mark used a render pump, essentially something similar to a concrete pump that pumps out render onto the walls; the render mix is made on site whilst the pump is going.


Natural render

The natural render mix consisted of the following ratio of ingredients: 75% sand, 15% clay and 10% lime. We had to do test patches with various ratios about a week before to ensure that the render will not crumble after drying. The first coat should also crack a little once set, which is a sign that it has bonded well to the walls. The consecutive coats of render will have increased amounts of lime and less amounts of clay.

The clay in the mix is the bonding ingredient, and helps the mixture stick to the strawbale walls. The lime hardens the mixture, and the sand is the showstopper. The colour, texture and quality of sand is what gives the house its final colour, unless of course you want to add an oxide which is purely there for aesthetic purposes. I was initially pro oxide use, but now that I see the somewhat finished effect, I have changed my mind and want to go all au naturale. This is Matty’s preferred option for two reasons: 1) the oxide mix cannot guarantee that the finished colour of the render will match expectations 2) oxides are very costly and will definitely blow our budget.

Second coat

The second coat of render will take two days to complete, this is because it will be about 30 mm thick compared to the 10 mm thickness of the first coat. Mark and the render gang are due to meet again for the second coat in a fortnight from now, giving the first coat ample time to dry and set properly.

The house currently looks a bit like play-doh, lumpy with straps and mesh sticking out.  We will fill the uneven surfaces with cob and staple the mesh in to ensure a flatter surface between now and the next round. Nonetheless, Matty and I are proud parents, patiently waiting to see the house blossom after its awkward teenage phase.

All bales are in, strapped up and braces removed!

House of straw

Two and a half weeks ago the first round of strawbales were delivered, and then four days later, the second batch.  All up we have 350 bales in our possession, and they are more than enough for the house… a few will be leftover which will get used in the chook pen, much to the chooks’ delight I’m sure!

Round 1 of bale delivery, 175 bales for our building pleasure

Laying it all down

When building the strawbale walls, it may seem simple enough to plonk the bales on the bottom boxing and then layer them as you build height, but there’s more to it than that.  Here’s a list of things to consider:

  • side of the bale facing the inside or the outside of the house, and each row must alternate from the previous one to ensure that the wall doesn’t bow. This is due to the fact that the bales have a more compact side and another fluffier side, thanks to the machine that cuts them
  • notches must be cut out of the bales when there are timber frames in the way
  • bales will need to be cut to size (using a bale needle) to fit into places
  • bales are always laid in a running bond (brick like manner) for sturdiness

Saying all this however, I feel that this part of the build was one of the most satisfying as progress happens relatively fast. It’s instant gratification when you see the house of your dreams literally being conjured up in front of you, after a lot of huffing and puffing of course…yes I HAD to throw that in there ;)

Feeling the tension

One of the more common questions we get about using strawbales is its fire risk. Living in rural Victoria this is obviously something that we took into account, especially as the previous house on the property had burnt down during Black Saturday.

Loose straw is extremely flammable, strawbales are also flammable however the earthen render that will cover them eventually negates this risk.  The strawbales get tensioned down to make them dense, which helps remove air pockets and transforms them into an unmovable barrier. This density is what aids in its amazing sound and thermal insulative properties also.

Tensioning is done in 3 stages to ensure maximum compactibility; and though not fire-proof, the fire resistant properties of compacted straw is very good.  I like to think that the house now has a kinky side as the tensioning straps look like orange suspenders…. yes I am weird :D  The straps will remain to ensure the walls remain steady and the first coat of render will cover them in a few weeks’ time.

Since we don’t have a video camera to take a time-lapse video, I have attempted to (somewhat badly) capture the progress of the walls going up on north-east side of the house.


Some more photos with the changes from the inside, with the kitchen in view.

Helping hands

Thanks to Ryan and Alex for giving up your free to time to come lend us a hand, and Fisher and Robin for trying to help us with our finances!  A few hours of help was also received from our local Benny Boy, whose amusing stories and strong arms keep up the building spirit. Matty and I are very grateful :)

Next up, it’s gonna be da na na na… na na hammer render time!

Battens, cables and bales

It is nearly time for the house’s most distinguishing feature to be delivered. Matty and I went to inspect the bales this morning, and they are mighty fine. I ain’t any bale connoisseur but these bales definitely looked like they could be the muscles of our house (the render will be the skin, the frames are the bones….important to get these anatomical details correct :D :D). Each of these wheat straw bales measure 965mm(W) x 450mm(D) x 375mm(H), making the walls quite thick and insulated. 350 of these bad bales will be delivered next week, and the remaining 100 a fortnight after.

Last week we completed putting up all the roof battens, and Jules (the sparky) spent a day with Matty roughing in (installing) all the electrical cable wiring through the house. These had to be done prior to bale insertion as some of the cabling will need to go through the straw. Now all that remains is to set up the straps and ply in the bottom boxing so that the bales can be tensioned down once in place.

This post is short and sweet, but the next one will commemorate the walls going in,  another milestone for the build!

A roof over our heads

The last day of January marked another milestone on Cooinda, the roof sheets were put up!  Three days later, Matty secured the flashing around the edges as well.

Tim, the plumber assisted Matty on the day.  As the skillion roof is on a 6 degree single pitch, the gutter will only be on the south side of the house, where eventually a downpipe will feed a 10,000 litre rainwater tank. We then started work on the roof battens this weekend; this is the timber on the inside portion of the roof that holds up the ceiling plaster as well as the roof insulation bats.

Alongside the roof extravaganza, I managed to finish varnishing the remaining 3 large windows of the house, thus completing the first coat of varnish for all 10 windows.  The second coat will be done once the windows are in the house.

It feels a little strange albeit the excitement; the house has become more grounded, more ‘real’ since the roof went up. There is a sense of security that was previously missing, and I find it hard to put into words how much a roof makes a difference.  They don’t say “at least I have a roof over my head” for no reason.

It is Matty’s birthday next week, so we are off camping to a spot west of the Grampians for the weekend.  Once back, we will be organising a delivery date for the straw bales… the adventure continues :)

First fascia board is up

The first quarter

And so we are close to our first quarter since the slab pour; 3 months, oh how you’ve whizzed by!  We’re on the precipice of the roof inauguration (yes, I used that word with intent).

Last weekend we had hired help from our local Benny Boy, a quirky character who we buy firewood from during the colder months.  He has the strength that I lack, and he lacks the fear of heights that I have, so it worked out for the better :D  He helped Matty put up the smart roof joists (as opposed to the intellectually challenged type).   In case you were wondering (like I was)… smart joists refer to a brand name of laminated timber that are light and strong compared to “normal” (aka stupid) joists :D  Am I getting down with the building lingo or what?!?!

The smart joists run parallel to each other with a 900 mm gap, and run down the length of the house (north to south).  These then are accompanied with purlins that run across the width of the house (east to west) again with a parallel 900 mm gap.  Next on the to-do list are the fascia boards that circumambulate (oooooh I use big words, I must be smart, SMRT!) the entire roof board and provide support for the gutter.

We have only just mounted the first fascia board on the north-east side of the house, the others are intended to be done within the next week, along with all the electrical wiring and cabling that run through the roof.  Tim (the plumber) is scheduled in to help Matty put the roof sheets up, and tick off all the plumbing related requirements just after Australia Day.

Straya day long weekend will be long indeed!  Can’t complain though, walking through the house now with just the roof joists and purlins up made us get goosebumps, let’s see what the roof sheets going up does to our emotions…

Front wall frames - view from the north

Bracing ourselves for 2017

The holiday season has come to an end, and it is bittersweet.  On the sweet side, the thrill of seeing progress is addictive; the bitter side, progress will now slow down as we won’t be dedicated to building most of the time.

The front wall frame is the crowning glory of this post, albeit not yet complete; remaining are the back lintels and a few brackets to secure all the lintels in place.  As you can see in the pics:
a) the posts were put up first, then
b) the ring beam and front lintels, and
c) the last of the bottom boxing

At 3.85 metres tall, the front north facing wall frames were a bit of a challenge, especially when it is just the two of us.  I attempted to conquer my fear of heights by climbing up onto the scaffolding, but the dread and queasiness did not ease even after my third time of being up that high.  I did manage to assist Matt despite my state of mind, though he mostly single-handedly secured all the lintels seen in the pictures.  It was worth the sense of accomplishment we both felt at the end of New Year’s Day.

New Year’s Eve was spent putting up all front wall posts and bracing all the external wall frames properly; the temporary braces that were placed previously had to come off as they would interfere with strawbale insertion.

All braced up
All braced up

During this past week I also focused my attention on varnishing 7 out of the 10 windows of the house, the remaining 3 are quite large and will require some kind of block and tackle contraption to secure it to the shed roof so that I can complete them. The windows are double glazed and made of beautiful Vic Ash timber.

The pool got some of our attention during the break. The property originally came with a saltwater pool, however as saltwater pools are quite costly to run we opted for a freshwater pool instead. The entire saltwater unit was sold, including the two 2000 watt water pumps that were used as part of the system.

Prior to Christmas Day, we had spent several days draining and cleaning out the pool, setting up a natural filtering system using sand, a submersible 20 watt solar water pump, stones and a funky tree trunk with concrete trough feature to hold this filtering system in place. On Christmas Day, we spent several hours prepping water submersible plants to be put into the pool.

The end outcome is somewhat like a pond, with plants sticking out of the now murky water.  2 cubic meters of crushed rock was placed in the pool to help resist algae growth, plus it feels amazing under your feet.  The water is a bit murky than it will be in the future due to all the crushed rock.  As time passes, the submersible plants and the crushed rock will assist in filtering the water as they act as a foundation on which microorganisms and bacteria attach to, both of which create an environment for water cleansing.  These helpful inhabitants alongside the sand filtering system (in the trough) will eventually make the water clearer, but pristine most likely never.

We got to christen the pool on Christmas Day, and it has been getting our attention nearly on a daily basis since then; the perfect remedy after a hard day of labour in the sun :)

With so many little triumphs, it is hard not to feel excited about the year ahead.  Every day brings forth a new challenge, and every day something new is conquered…. not always that easily but we try to be hopeful.

Happy new year dears, cheers to at least another 10 months of building!

Sneak peek of Matt's self-devised work bench and area, where most of the timber cutting (and other handy) magic happens!!
Sneak peek of Matt’s self-devised work bench and area, where most of the timber cutting (and other handy) magic happens!
It's up in the air!

Three month mark and the mighty ironbark…

Today marks the 3 month lunaversary since the day we first started prepping the site for the build,  and not even 2 months have passed since the slab was poured.  I think we are making good headway, but Matt seems to think otherwise….

The external timber frame has been progressing nicely, now with most of the bottom boxing and window lintels in place.  The back south-facing wall frame is also ready for bales to be put in.

South facing external wall frames ready for strawbale insertion

The front wall frames are yet to be done, they measure up to 3.85m in height and require many posts and beams that will provide structural support for the sloping roof and the massive north facing windows.  Before these can be put into place, a major hurdle of placing the 6.5m long ironbark timber beam in the middle of the house had to be completed. This beam is estimated to weigh about 1 tonne, and is integral to the house structure.  This nerve wrecking task was successfully administered yesterday, once again with our excavator acquaintance, Bert (who loves dirt)…

The holiday season gives us a chance to work with no interruptions on aiming to have all the external wall frames put in place.  Now that some warmer weather is finally on the way, hopefully the swimming pool will get some of our attention too!

Happy holidays lovely peeps and thanks for keeping up with our adventure.
Lots of love from our shack to yours :D  xoxo

The finished wall and the window box

Getting our fam into it!

This past week has been memorable to say the least.  My sister got married and Matt’s mum and her hubby Mal made a special trip from New Zealand to attend the wedding.  Matty and I could not help but get them involved in the build process, free labour after all!  JUST KIDDING!!  :D (not really)…..they wanted to help and we happily obliged :)

The looming besser block wall is finally finished, with just one brick remaining which will be put into place after the timber beam is up.  Mama and I helped fill in the holes between the blocks wherever needed and Mal helped with some much needed site cleaning, digging and levelling.

The first external facing frame was installed today.  It is a box that is situated under the main bedroom window to provide support for the high north facing windows.  It will serve as cupboard space later on, as well as a window seat when decked out with cushions and pillows.  A little reading nook by the winter sun :)

Thanks Mama and Mal for not only visiting for my sister’s wedding, but also for making your mark on the build. We loved having you here and are missing you both already…

Besser block wall

Bottoms up, besser blocks!

Less than 2 weeks have passed since the first internal frame was up. Two days later, the rest of the internal wall frames were up too, this includes the walk in robe walls for the two bedrooms, and the bathroom and shower walls.

Matt then started on the besser block retaining wall. This wall will be used to retain heat as the firewood heater will sit in front of it, as well as capture the heat from the north facing windows.  It also provides structural support and will be decorated with slate tiles on one side, and render (with some funky add ons) on the other. As Matt progressed from one block course to the next, he realised how much he detests this task, all bricklayer ambitions forsaken. This is one job he will clearly not be repeating in our future extensions.

Despite the unenthusiasm (I can hear him saying it’s a $#^% of a job as I write this!), it is one task that has to get done and we cannot change it. Matt is half way up the wall (on the ninth block course), another eight to go… hopefully he can move onto the bottom plate, top plate and external walls by early December.

I offered to help, but since this weekend was my birthday he decided to celebrate instead.  Matty got a break from the block wall at last…  Bottoms up, besser blocks!

Second block course and internal wall frames
View from the bathroom with the shower frame
Matty doing his favourite job
Ninth course of the besser block wall